
Monday, July 10, 2023
Sunday, May 14, 2023
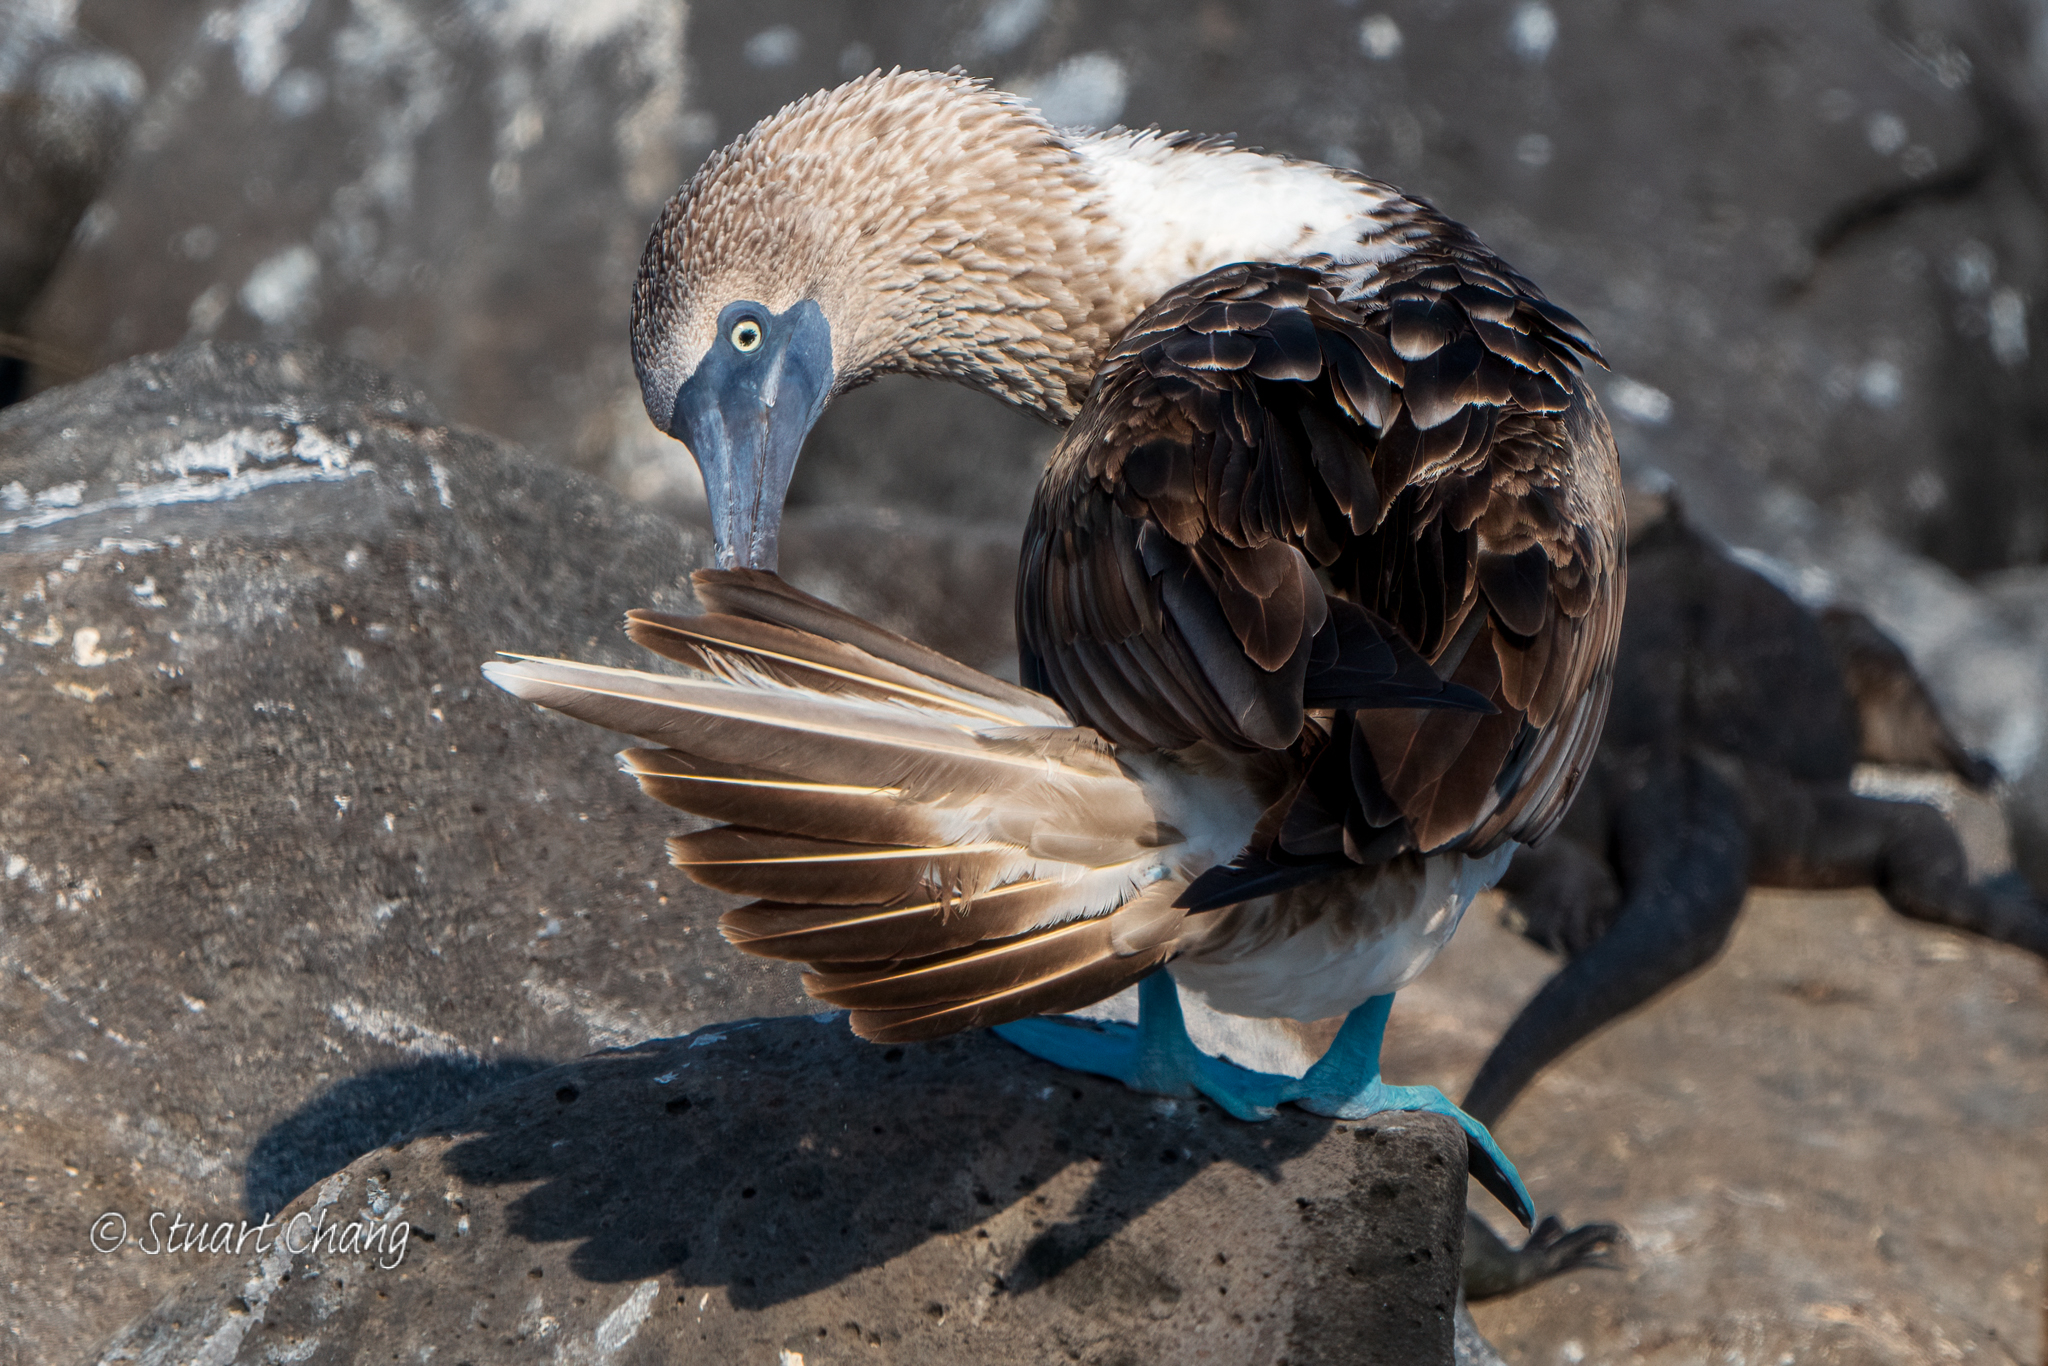
Photographing the Galapagos with an iPhone
I visited the Galapagos on the Celebrity Flora in January 2023 and the opportunities for capturing the flora and fauna are endless.
I used two cameras to capture my trip - a Sony A7R3 Mirrorless with a 200-600mm zoom, and an iPhone 11 Pro Max.
On this vacation, I used both for different reasons. I use my Sony Mirrorless to capture the wildlife because I wanted “fine art” quality pictures, and I used my iPhone to capture more casual snapshots and landscapes. A link to my post about this can be found in the comments as well as a link to a video of the results.
That’s not to say that the iPhone (especially the newer iPhone 14 Pro Max) can’t do a good job of capturing everything, but when compared to something like a Mirrorless or DSLR with a long lens, the iPhone does have some limitations.
That said, here are some tips to get the most out of your iPhone when capturing the Galapagos (in no particular order, except for #1).
UNDERSTANDING YOUR IPHONE CAMERA
1. Under no circumstances use “pinch to zoom”
I put this tip first because if you only remember one thing, then remember this one. While much of the wildlife may be off in the distance, there is a temptation to zoom in using the pinch gesture. I recommend against doing this because what the iPhone is doing is digitally creating new pixels that simply aren’t there in real life. As a result, your photo will be filled with digital artifacts and look very unrealistic. Instead, select one of the optical zoom lenses and then edit the photo later to crop the image to “zoom” after you capture the image. I assure you, this will produce an image more clear than if you use pinch to zoom which digitally creates pixels. The optical zooms are the numbers right above the shutter button on the screen. You may see .5, 1, or 2, and if you have the iPhone 14 Pro/Max, then even a 3. You can try this at home before you go to experiment with it yourself. These numbers select the optical zoom lenses on your iPhone and no artificial pixels are created. The reason you want optical vs digital zoom is, the digital zoom will look pixelated and blocky and just not real.
2. Get to the camera app fast
Opportunities for pictures or video can happen very quickly in the Galapagos. If your phone is off (not already on with the camera app open), instead of pressing the power button or tapping the screen to wake up the phone and then waiting for face recognition to do its thing or entering your passcode, simply swipe left from the lock screen and the camera app will appear.
2a. This one is a little more advanced, but super cool. You can actually get to the camera app by double tapping the back of your phone. This is handy if you’re in the middle of another app and an animal appears unexpectedly and you want to bring up your camera app. Do the following to set this up:
- Settings>Accessibility>Back Tap>On
- Select “Double Tap”
- Scroll down and select “Camera”
Now give it a try. Turn on your phone and open an app.. Any app, email… Facebook.. Whatever.. While in that app, double tap the back of your phone. The camera app should start.
3. Use the volume “UP” button to take a picture or video
Now that you quickly have your camera app open, instead of fumbling for the on-screen shutter button, or even swiping around on the camera interface to switch to video mode, try using the “volume up” button to take a picture or video. To take a still picture, a quick press, just like a regular camera button, of the volume up button will take a picture. If you press and hold the volume button, the iPhone will take a video for the length of time you are holding down the volume up button. A side note, I would not use this method to take a very long video since you’ll have to be pressing the volume up button for a long time. There is a setting change you may have to make to get this to work. Go to SETTINGS>CAMERA> then uncheck “Use Volume Up for Burst”. If later you decide you want to use the volume up for burst mode, then you know where to go to change that back.
4. Consider VIDEO mode over PHOTO mode
Many opportunities to capture wildlife in the Galapagos are more suited for video rather than photos. I would have you consider anything that is moving like flying birds, fighting iguanas, sneezing iguanas if you are so lucky to see that, swimming penguins, Nazca or Blue Footed Boobys doing a mating ritual… consider taking a video instead of a still photo. I would recommend that you do take video at 4K at 30fps for several reasons. (a) 4K gives you more resolution to work with. If you are so inclined, you can crop the video to 1080p to zoom in later and it will still look great (oh tip #1 applies to video as well. Never pinch to zoom. (b) I recommend 30fps mainly to manage the file size. 60fps will be a larger file and unless you plan to slow down your video later, most sites that you would post the video to will default to 30 fps like Facebook or YouTube. (c) You can still take a photo while taking a video. Yep, that’s right, you can take still photos while taking a video. As soon as you start taking a video you will see a still capture button (white circle) pop up on the screen. Just tap that button to take a still photo and it will be in your camera roll. There is a caveat, the still photo will be 7MP vs 12MP. To set your camera to 4K 30fps go to SETTINGS>CAMERA>RECORD VIDEO>4K at 30fps.
The one downside of 4K video is it does take quite a bit more memory storage so if you have limited memory storage, then you should opt for 1080p 30 fps (default setting).
5. Tap to focus and set exposure
The lighting conditions in the Galapagos can be challenging. You could be trying to take a photo of a tortoise deep under brush, or a mostly white red-billed Tropicbird in flight against a light blue sky. The iPhone does a great job at auto focus and exposure but sometimes it needs a little help figuring what you are trying to take a picture of and what to get in focus and properly exposed. If you find your subject out of focus or too dark or too light, simply tap the subject on your screen and the iPhone will focus and set proper exposure to your subject. This is also highly recommended for sunrise or sunsets. Have you ever noticed that the sunrise or sunsets never really look as colorful as you are seeing with your eyes. Simply tap the brightest part of the screen (usually the sun or surrounding clouds) and the iPhone will set the proper exposure for the sunset and immediately the contrast and details will pop. If you don’t like the exposure that the iPhone selected after you tapped, then immediately slide your finger up to brighten, or down to darken the exposure.
6. Turn on Smart HDR
As mentioned above, lighting conditions in the Galapagos can be challenging especially when on a trail with a lot of flora and the lava lizards, iguanas, and tortoises are hiding in the brush. I keep “Smart HDR” always on in my settings. HDR takes several shots of the same scene at different exposures and then blends them into a single photo. By setting this to always on, the iPhone will take HDR photos when it's the most effective and captures true-to-life colors and contrast. To turn this on, go to SETTINGS>CAMERA>SMART HDR.
7. When to use LIVE Photo and when not to
LIVE photos are essentially very short 3 second videos. The iPhone essentially takes 1.5 seconds of video before and after to press the shutter button. Many people have LIVE photo turned on and don’t even realize it. LIVE photos are good if you intend to apply one of the LIVE photo special effects such as Loop, Bounce, or Long Exposure. If that is not your intent, then I’d recommend you not take LIVE photos and turn that feature off. A quick Google search will show you how that is done.
COMPOSITION
8. Orient your camera based on your subject and how you intend to share your photos and videos
For some reason, the world has evolved to cell phone photos and videos all being taken in “portrait” orientation. If your goal is to have photos and videos for you to primarily remember your vacation or to post in a Facebook post (not a Facebook Story or Instagram Reel), then you should orient your phone depending on your subject and the composition. If you intend to post for Facebook Stories and Instagram Reels, then use portrait orientation. For example, if you are taking a photo of a flamingo fairly close up and you don’t necessarily care about the background, then portrait may be a good orientation. If you are taking a picture of an iguana laying on a rock, then landscape orientation may be better. Point is, please stop taking portrait only pictures just because that’s how you hold your phone.
9. Use the “Rule of Thirds”
There are many composition rules., but this is by far the simplest to learn and the most impactful given the effort in learning and applying it. The theory is, a centered image is boring because we tend to look at things symmetrically. The rule of thirds offsets the main subject to ⅓ of the screen and creates an uneasiness to the view, but it also creates interest. The mundaneness of the centered image is gone.
This concept is a little hard to describe in words only so before reading more, grab your iPhone and let’s turn on the rule of thirds grid on your phone. Go to SETTINGS>CAMERA>Turn on grid. Now open the camera app.
You should now see two lines running horizontally and two lines running vertically. Each line is ⅓ the way on the screen. So from the top, the first horizontal line is ⅓ the way down, and the second horizontal line is ⅔ the way down. Repeat this for the vertical lines and you end up with a grid of 9 rectangles.
In the rule of thirds, the 4 intersections you see on the screen are the most impactful places to focus your subject such as the eyes of an animal. Also, which intersection you pick matters given which way your subject is looking. For example, If you have a bird looking to the left of the screen, then place the subject on the intersections on the right side allowing the animal some “headroom” on the other ⅔ of the frame. If this is confusing, go back and watch the video I shared and it will become immediately obvious.
The rule of thirds is particularly impactful when there is a horizon involved, especially sunsets. Look at any movie where there is a sunset or a horizon and you’ll notice that they have the horizon on the button third of the frame. The Galapagos has many opportunities for horizons in your shots. It doesn’t mean the horizon is always at the bottom third. It can be either at the top or bottom depending on where your subject is. Oh and one pet peeve of mine, for the love of anything sacred, make sure your horizons are straight. If you didn't capture it straight, then edit your photo later and use the crop function to straighten the horizon. This alone will make that picture 10 times better.
The rule of thirds is just a rule, it’s not a law, so there are composition exceptions such as if your subject is staring straight at you and is perfectly symmetrical, then maybe a centered image may work too. It’s subjective.
10. Fill the frame
As a composition rule, the idea is to get rid of any other distractions so the viewer only focuses on the subject. When initially taking your photo, try to fill the frame as much as possible. If that means walking closer, then that’s what you have to do.
I know this will be challenging especially in the Galapagos when some of the animals are not next to the trail. This is where cropping comes in later when you’re sitting on the ship looking at your memories from the day and thinking about editing a few of your favorite ones to improve the composition. Remember rule #1 above… do not pinch to zoom. This is where this comes in handy. If you cropped in on an image where you used pinch to zoom, it will look beyond awful. But if you crop and adjust the composition to the rule of thirds while filling as much of the frame as possible with optical zoom, you will have as good of a photo as you can get.
11. Get down low or get up high
Interesting pictures are about seeing things from a perspective that people don’t normally see. As adults we see most things from the perspective of standing or walking around. That’s what they have become accustomed to so pictures taken from this perspective have become mundane.
If you see a tortoise walking on the trail, squat down or even sit on the trail (respecting distance rules) and try to get a picture eye level with the tortoise. In fact, whether it’s a tortoise on a trail, or an iguana on a rock, or a blue-footed booby on a ledge while you are in the zodiac, try to take all your images where you are eye level with their eye level.
If you are taking a picture of a single animal, the best picture will be them looking right into your camera. If you can't get that shot, then get at least both their eyes. If you can't get both eyes, get at least one eye. If you can't get any eyes, keep trying. A picture of the back of a frigate bird flying away from you might be good to prove you saw one, but it's not as interesting as one where you can see their eyes.
Side note, this works great for your grandkid and dog pictures. Get down on the ground to get pictures of your grandkids playing. They’ll look so much better.
12. Don’t forget to use the Panorama setting
The iPhone has a great setting for taking Panoramas. The Galapagos affords many opportunities for taking panos, but don’t go crazy and take a long 180 degree pano (unless you intend to post it as a 360 later)
Use the Panorama setting when you can’t quite get what you want in a 4:3 or even a 16:9 aspect ratio. But don’t take an excessively long panorama. What happens is the photo’s height to width ratio becomes too wide and it makes it unusable to view. Sure you can scroll back and forth on your phone to see it, but if you post it on Facebook, it will look very small because Facebook is trying to fit the width into the viewable area for the post so it looks tiny. The only exception to this is if you capture a wide enough panorama and you figured out how to post a 360 degree photo in Facebook.
Most people take horizontal panoramas, but a cool trick is to use it to take vertical panoramas. This takes a little more practice especially to keep the lines straight because we’re just not used to that motion with the phone. Here is an example of how you could use it. We were at the Darwin Research Station and this gentleman next to me was trying to take a picture of a very tall tree that he was standing next to. He was leaning as far back as he could while trying to take a picture of this tree from top to bottom. I showed him how to turn on Panorama mode then change the orientation of how he held the camera to take the panorama from bottom to top vs left to right so he could get a picture of the entire tree in one photo. It works great for tall buildings too.
LIGHTING
Lighting plays a key role in photography. In fact, my view is that observing how light affects a scene or how it’s bouncing around is key to better photographs. There are numerous elements about light, but for simplicity sake, I’ll mention a few that make a big impact.
13. Be aware of the direction of the light.
We all remember being told, “have people look into the sun to take a picture”. I don’t know if I agree with that, but I will say that the more light you have on your subject, the more contrast you will get and therefore more clarity and definition. For wildlife photography that’s ok. Not so much for family portraits. Try this small experiment. About late afternoon, when the sun is out (not on a cloudy day), go outside and find an object like a mailbox or something you can walk completely around. Walk around the object taking 8 pictures. 0 degrees, 45 degrees, 90, degrees, 135 degrees, 180 degrees, 225 degrees, 270 degrees, and 315 degrees. Now look at how all those pictures of the very same object look very different. The one directly facing the sun will have the most color, contrast, and clarity. The one opposite that angle will have almost no color, contrast or clarity. The rest are between those two views. So when taking pictures of the animals, try as much to get as much direct light on them as possible and the only thing you can really move is yourself. Feel free to move around within the guidelines set forth by the naturalists, but don’t just take the picture because that’s where you were standing in the group. Move around, the group won’t mind if you politely ask to move to get a better shot.
14. Light has color and can add or take away depth,
I put these two concepts together because they are very related to the time of day.
From sunrise to sunset, the color of the sunlight changes from a warm and soft golden hue in the morning and later afternoon to a cool and harsh blue to white color when the sun is directly overhead. I know you can’t control when you go on excursions, but just something to be aware of.
Morning and afternoon light will give your picture warmth and the long shadows being cast give your photo depth.
Mid-day light will make your pictures very clear, but it will look flat and harsh.
Again, not much you can do, but thought you should be aware.
PHOTOGRAPHING PEOPLE
15. Don’t forget the selfies!
I know you are there to get tons of pictures of what you are seeing, but don’t forget to get pictures of you and your family seeing what you are seeing. And not just the ubiquitous arms out posed selfie even with an animal in the background, but take pictures of your family interacting with their surroundings. Take pictures of them hiking across the lava field, or pointing at a bird in the distance. I think you’ll find that the non-posed pictures are the ones you’ll enjoy the most.
16. Don’t put the horizon through their head.
You will be on a ship, and on beaches, there will be tons of pictures with the horizon in it. Try to compose your shot where the horizon is not horizontally right through the middle of their head. This usually means holding the camera slightly higher and pointing down where their head is below the horizon or holding the camera lower pointing up where their head is above the horizon. BTW - No one will want the latter so it’s usually holding the camera slightly higher pointing down.
CONCLUSION
I covered a lot. If anything is unclear, I’d be more than happy to answer any questions. I would recommend trying out all these things and practicing before you go. Some of it does take getting used to to become second nature and trust me, when the wildlife is moving fast, it will need to be second nature.
I also have one other posts here that may help. It is called "Photographing the Galapagos from the Celebrity Flora". While that focuses more on DSLR and Mirrorless cameras with big lenses, it has a ton of information about what type of animals you will see and at what distances and under what conditions. It also talks about the terrain, and other non-camera topics.
I also have a YouTube video of many of the pictures I took. After reading this post, you can see much of the concepts I talk about in the pictures in the video. NOTE: This video shows the lighting and composition techniques I talked about above. Most if not all of these pictures were taken with a Sony Full-Frame camera with a 200-600mm lens.
Hope this helps.
Sunday, February 12, 2023
Photographing the Galapagos from the Celebrity Flora

PREFACE
This guide is intended for the amateur/hobbyist photographer who has questions about what gear to bring, how to protect your equipment, what type of shooting conditions you may encounter, and even what to wear while shooting in the Galapagos. While this guide is not specifically intended for the casual point-and-shoot or cell phone photographer, some of the tips about terrain and conditions may come in helpful.
This guide is also written from the perspective of cruising on the Celebrity Flora, but apart from getting on and off the Zodiac boats used by the Flora, much of this guide will be applicable to any cruise.
As you read the forums, inevitably you'll come across a post where someone asks the question "What camera or lens should I bring to the Galapagos?", and among the responses you'll see answers like, "I took my cell phone and it was fine", or "I had my DSLR with my 24-70 kit lens and I got great pictures".
What I'd have you consider is, what are you expecting and what type of photos are you hoping to capture. That is the main consideration of what type of gear and lenses you'll need to bring. I'm certainly not saying that you won't enjoy cell phone or point-n-shoot photos if that's your expectation. This guide is only attempting to help people struggling with what zoom lenses and other larger camera gear to bring. I took many photos with my iPhone and loved them just as much. That's just a different guide :-)
This guide will assume you are hoping to capture photos above the casual snapshot from a cell phone or point-n-shoot camera. So photos potentially suitable for something like a stock photography site (note the Galapagos National Park has restrictions on Commercial photography) and not snapshots for Facebook to document what you saw.
SUBJECTS
On my trip I came across mostly 4 shooting scenarios. Many of you may be able to read this section alone and be able to decide what gear you need to bring.
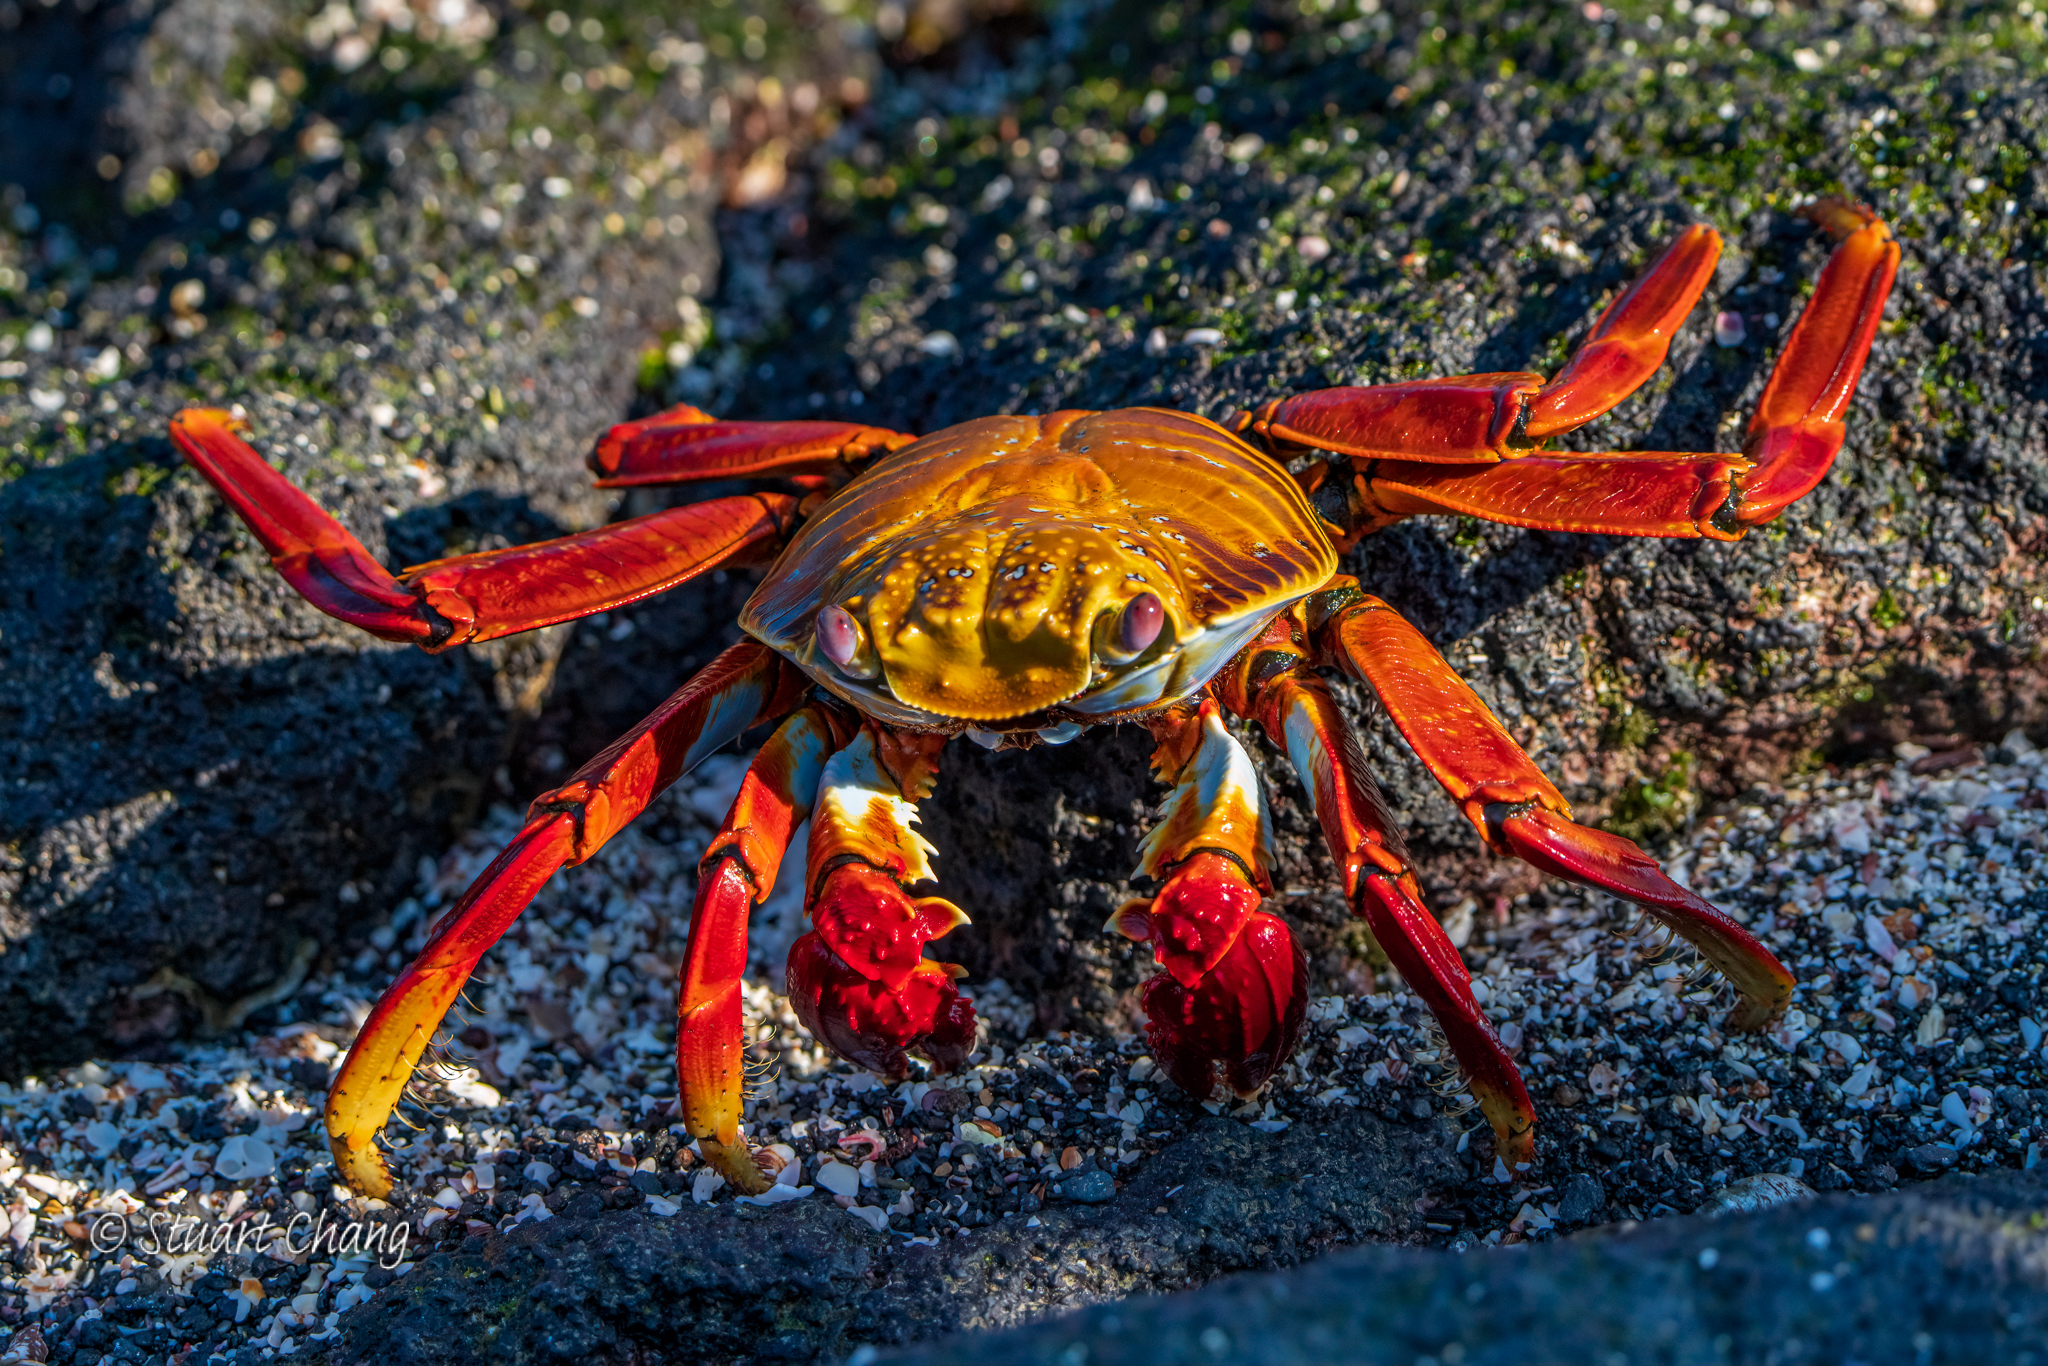
1. Slow or still wildlife that you could get as close at 6 feet (the minimum distance required by the Galapagos National Park) to about 15 feet, which is basically next to the trail. Speaking of trails, that is the primary factor determining the distance between you and the flora and fauna. In the Galapagos National Park, visitors must stay on the designated trails. On or next to the trails, you'll be able to see tortoises, iguanas, sea lions (not seals), nesting birds, crabs, lava lizards and more.
 |
| 300mm 1/1250 sec f/8 ISO 3200 |
 |
| 600mm 1/1600 sec f/6.3 ISO 500 |
 |
| 600mm 1/1250 sec f/6.3 ISO 1250 |
 |
| 600mm 1/1250 sec f/9 ISO 640 |
 |
| 353mm 1/1250 sec f/8 ISO 1600 |
 |
| 470mm 1/1250 sec f/8 ISO 800 |
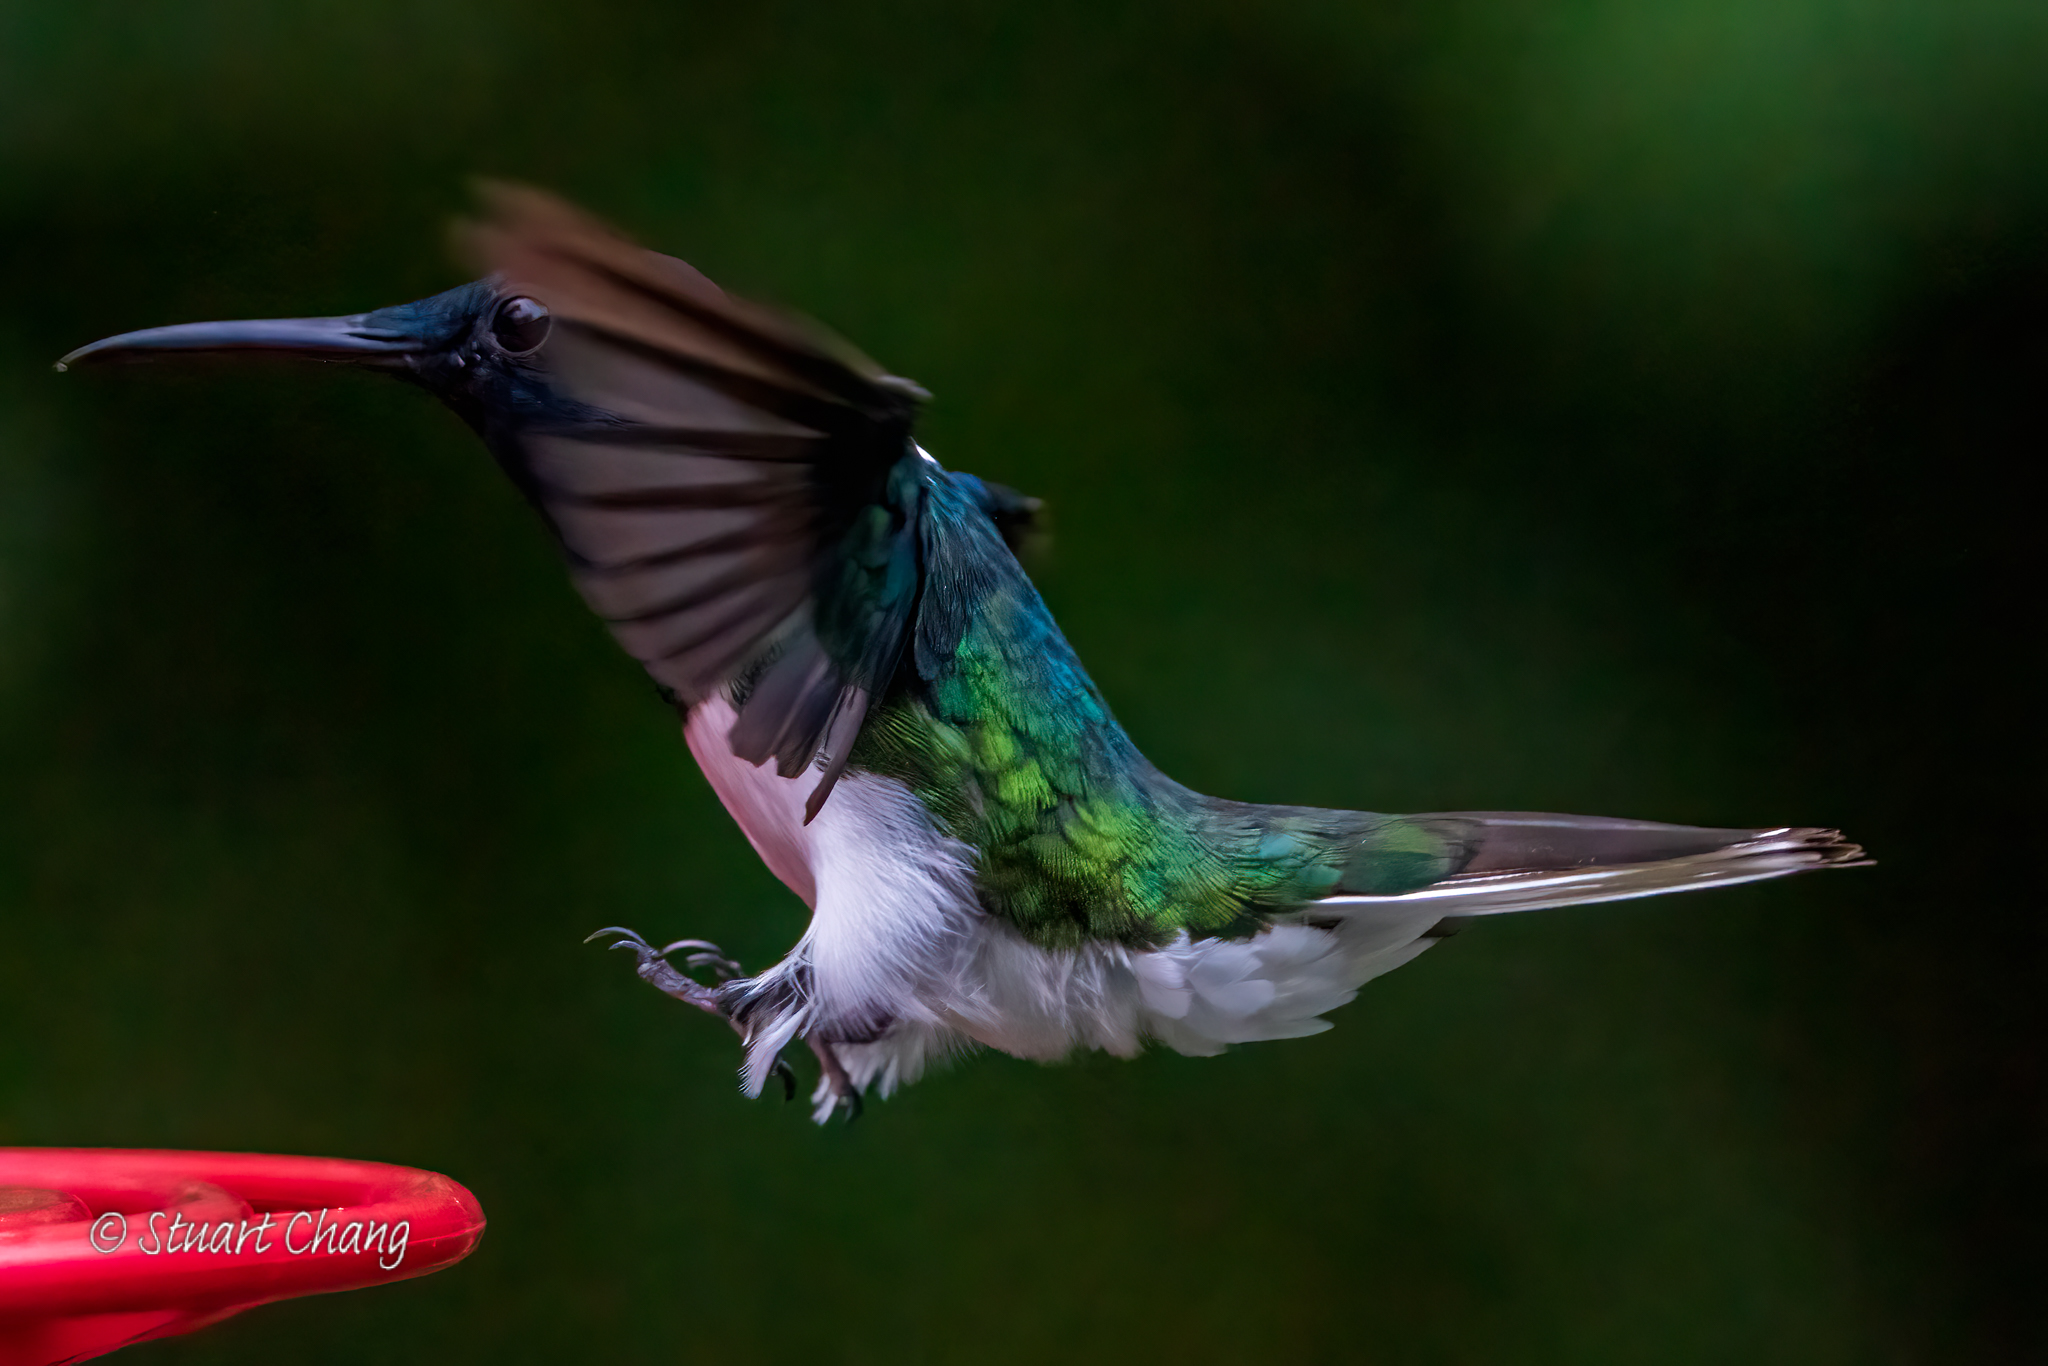
2. Fast moving wildlife that you could get as close at 6 feet (the minimum distance required by the Galapagos National Park) to about 15 feet. While there are some opportunities for this scenario on the islands, I mostly encountered this when we went on a tour of the Cloud Forest outside of Quito and visited a hummingbird sanctuary. In this case, while the humming birds were within arms reach, I still used very long focal lengths to separate the subject from the background. In this case, my relatively slow 5.6/6.3 lens was very slow, so to achieve fast shutter speeds, I bumped up the ISO significantly to compensate. Later I used Topaz Labs DeNoise AI to reduce or remove the high ISO noise.
 |
| 353mm f/6.3 1/3200 sec ISO 5000 |
 |
| 391mm f/6.3 1/3200 sec ISO 4000 |
 |
| 359mm f/8.0 1/3200 sec ISO 6400 |
 |
| 452mm f/8.0 1/3200 sec ISO 6400 |
 |
| 388mm f/6.3 1/3200 sec ISO 4000 |
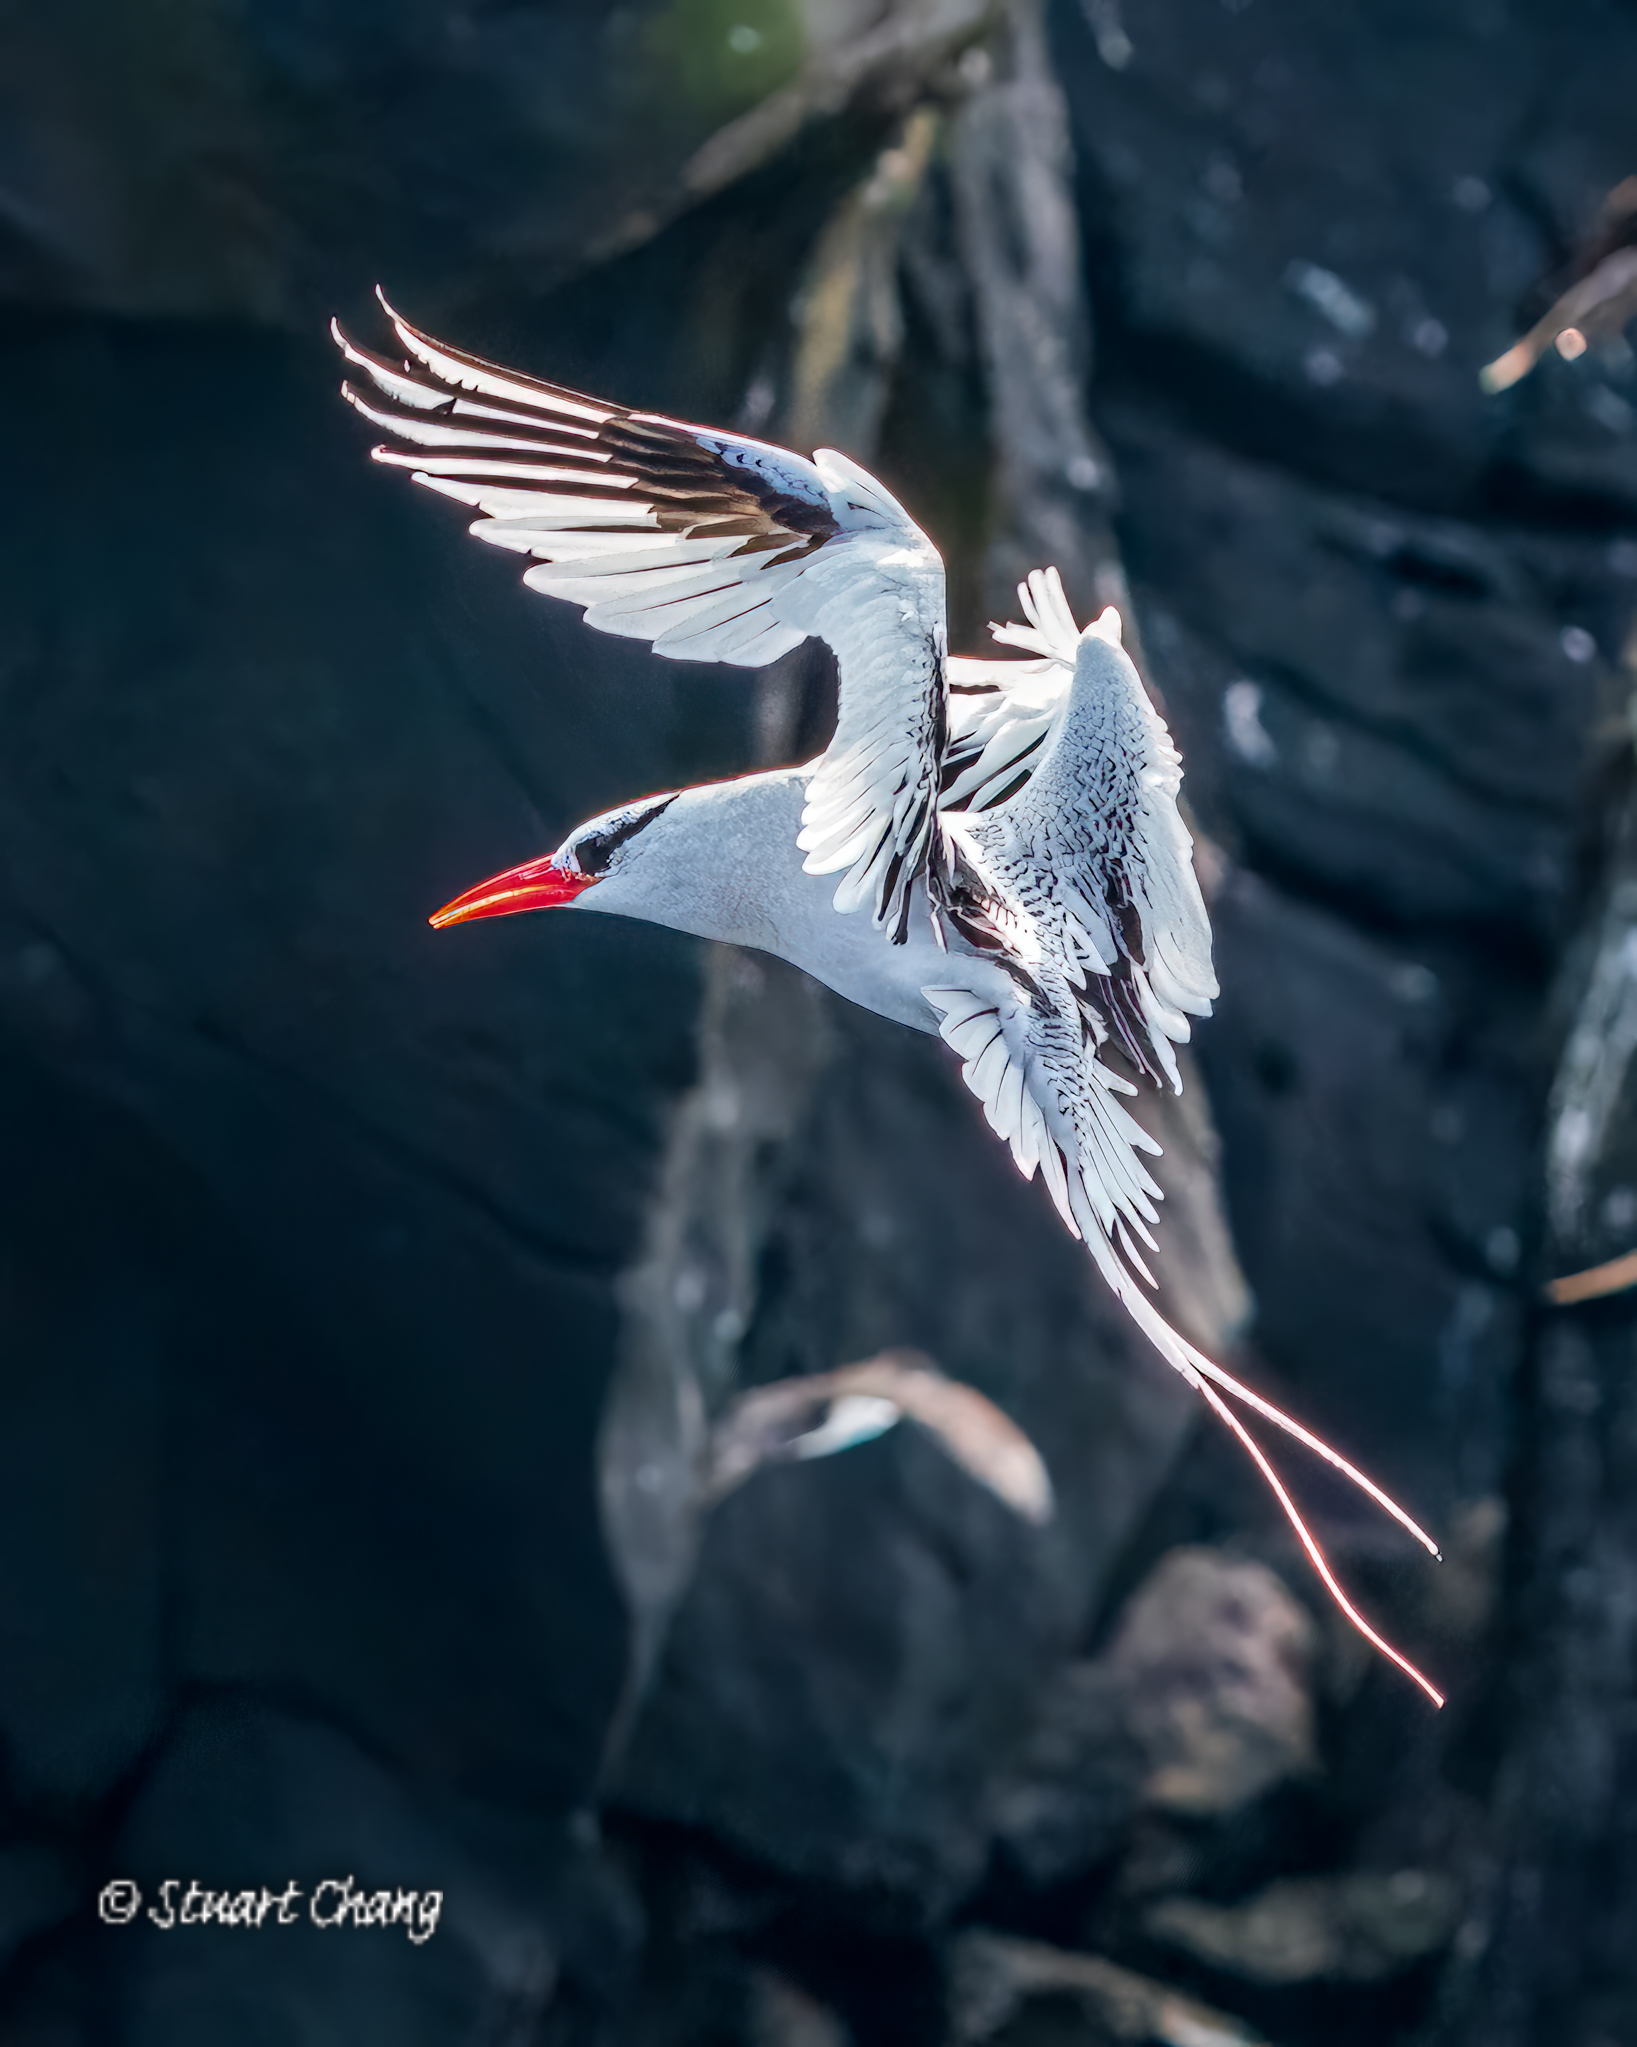
3. Slow moving or relatively still wildlife (sometimes taken from a slow moving or rocking zodiac) that is farther than 15'. This includes wildlife in the distance where you just need a long reach but for the most part subject motion blur is not an issue or minor camera shake can be handled by most optical stabilization systems. This includes seabirds on shore while you're in a zodiac, or wildlife in general that is farther from the trail where you are not permitted to walk.
 |
| 404mm f/9.0 1/1250 sec ISO 1000 |
 |
| 379mm f/8.0 1/2500 sec ISO 1250 |
 |
| 600mm f/6.3 1/1250 sec ISO 400 |
 |
| 600mm f/8.0 1/1250 sec ISO 1250 |
 |
| 600mm f/6.3 1/2500 sec ISO 1600 |
4. Fast moving wildlife that is farther than 15'. For me this was mainly birds in flight. For these shots, I wanted a fast shutter speed and with such a slow lens (5.6/6.3) I had to really push the ISO to get the shutter speed I wanted. Again, I wasn't afraid to do that since I knew I could reduce the noise in post. Honestly, the hardest part of these shots is finding the subject as it was flying. I zoomed out to 200mm to get a better field of view, and once I found the birds in flight, zoomed in and took the shot. These were by far the most challenging shots of my trip. You'll notice several photos at the ~200mm ish focal length. The birds were moving so fast the only way I could acquire them was to zoom out to 200, then once acquired attempt to zoom back in, but by that time the birds may be landing or doing other things I wanted to capture and I was not quick enough to zoom in so I just took the shot. For these examples below, they are significantly cropped. I had focus on "continuous".
 |
| 209mm f/7.1 1/1250 sec ISO 3200 - Significantly cropped |
 |
| 379mm f/7.1 1/2500 sec ISO 800 |
 |
| 368mm f./6.3 1/2500 sec ISO 800 |
 |
| 600mm f/6.3 1/1600 sec ISO 640 |
 |
| 200mm f/5.6 1/2500 sec ISO 800 - Significantly cropped |
 |
| 600mm f/8.0 1/1250 sec ISO 500 |
 |
| 268mm f/7.1 1/2500 sec ISO 10,000 - Significantly cropped |
 |
| 318mm f/6.3 1/1250 sec ISO 1250 |
LIGHT
Above are the 4 general scenarios that I encountered during my visit. Of course, the other factor to consider is the amount of light. I have seen YouTube videos that say the Galapagos in on the Equator and there is always a lot of light... that's just not true - well the part about always having lots of light. Even at mid-day, there can be cases where on the trail there are a lot of bushes or the wildlife is hiding in the bushes. The other time I encountered low light during mid-day was when shooting birds in flight that nested on cliffs that were in the shade. You can see in some of the pictures above that some of those cliffs can be black lava rock making it challenging for the camera metering system to capture a small white bird against a mostly black background. The final low-light condition I encountered was during a late afternoon zodiac tour against the cliffs of one of the volcanos where the boat driver stayed in the shadow of the volcano the entire time. So just some things to consider as you decide what gear to bring. That said, I'd say 70-80% of the shooting conditions there is plenty of daylight.
LENSES and specifically focal length.
The most common question I see on the forums is what lens to bring. Consider everything above with respect to the distance and movement of your subjects and also what I mentioned about lighting and how much separation you want between your subject and the background to make your decision on what gear to bring.
While it is true that the wildlife can be close, in my opinion a 24-70mm zoom should not even be considered if you want any of the types of shots in the examples above.. On a pre-cruise day trip in Quito, I had my 24-70 on a FF body and I could barely get pictures of a hummingbird I saw at the Equator Museum that was 15' away. Speaking of Hummingbirds... if you are a bird photographer and you are content with your gear for bird photography, then most likely you will be happy with that same gear for Galapagos wildlife in all of the 4 scenarios I mentioned above.
So what about a 70-200mm on a FF body. I'd say that if that's all you have, then you might get some of the shots you want, but I expect that you'll be zoomed to 200mm for the majority of your photos. I met someone on our trip who owned both the 70-200 and also a 100-400, but he only brought the 70-200 to the Galapagos and told me he wished he brought the 100-400mm.
I brought a Sony 200-600mm 5.6/6.3 and I was able to get every shot I attempted to get. That said, I think if you brought a 100-400mm on a FF body, you'd also get most of what you wanted to capture. Even though I had a 200-600mm lens, there were times when even the 600mm was not long enough so I had to crop heavily, but fortunately I have a Sony A7R3 with a 42.2MP sensor. If you look at the focal length of the photos I show above, you'll see that I was rarely at 200mm. The only time I went that wide was on occasion to get a field of view wide enough to find a very fast bird in flight and in that instance, I had to take the shot before I could zoom in once I got the bird in my viewfinder. Most of the shots in the category of "far away and fast moving" I wished I could have zoomed in more, but juggling being able to acquire a very fast moving bird (zoomed out) then zooming in to get closer was a bit challenging for me, hence I took the shot when zoomed out more than I wished and cropped in later. If you have mastered this skill, I think a 100-400mm would work for you.
So what about taking a 24-70 for shots where wildlife is close up. At the shorter focal lengths, unless you've got a really fast lens like an f/2.8 or faster, you just won't get the separation between the subject and the background that makes the background drop off so you can can focus on the subject. For example, I did take a few hummingbird pictures with my iPhone using the lens that has an equivalent focal length on a 35mm full-frame of 52mm f/2, and while I was able to get up close and get a fairly clear picture of the hummingbird, but the entire background is also in focus. Compare that to the photo taken at 388mm even at f/6.3, the background just fades away.
One closing note on big heavy lenses. I have read comments where some people are reluctant to bring 400mm or 600mm zoom lenses because of weight. Yep, they are heavy, and I struggled with this decision too, but.. a good wide strap can mitigate that feeling of being heavy. I definitely felt the weight when using my stock Sony strap because it was so thin and I wore it around my neck. But then I bought a Peak Design "Slide" strap and wore it cross-body as it is designed to do and the perception of weight was like night and day. So if you are struggling with a decision based on weight, there are ways to mitigate that concern. Some people even had chest harnesses for their 100-400mm lens and camera. Once you distribute the weight (think a backpack with 6 lbs), those big and heavy lenses just don't feel heavy anymore. This is a once in a lifetime trip and you will see this wildlife once. Walks are usually no more than 2 miles tops. Get a good weight mitigation strap, wear it properly, and you won't regret bringing the big heavy lenses.
 |
| iPhone 11 Pro Max |
 |
| Sony 200-600 - 388mm f/6.3 1/3200 sec ISO 4000 |
PROTECTING YOUR GEAR
We went to the Galapagos during the first two weeks of January which is the beginning of their rainy season. Fortunately for us we did not encounter much rain if any while on tour on the islands. We did get a small amount of rain in Quito and Mindo. The biggest concern I had about protecting my gear was during the zodiac rides from the ship to shore, not from any rain. If you go during the rainy season, protect your gear for rain accordingly.
On the Celebrity Flora, there are a few things to know.
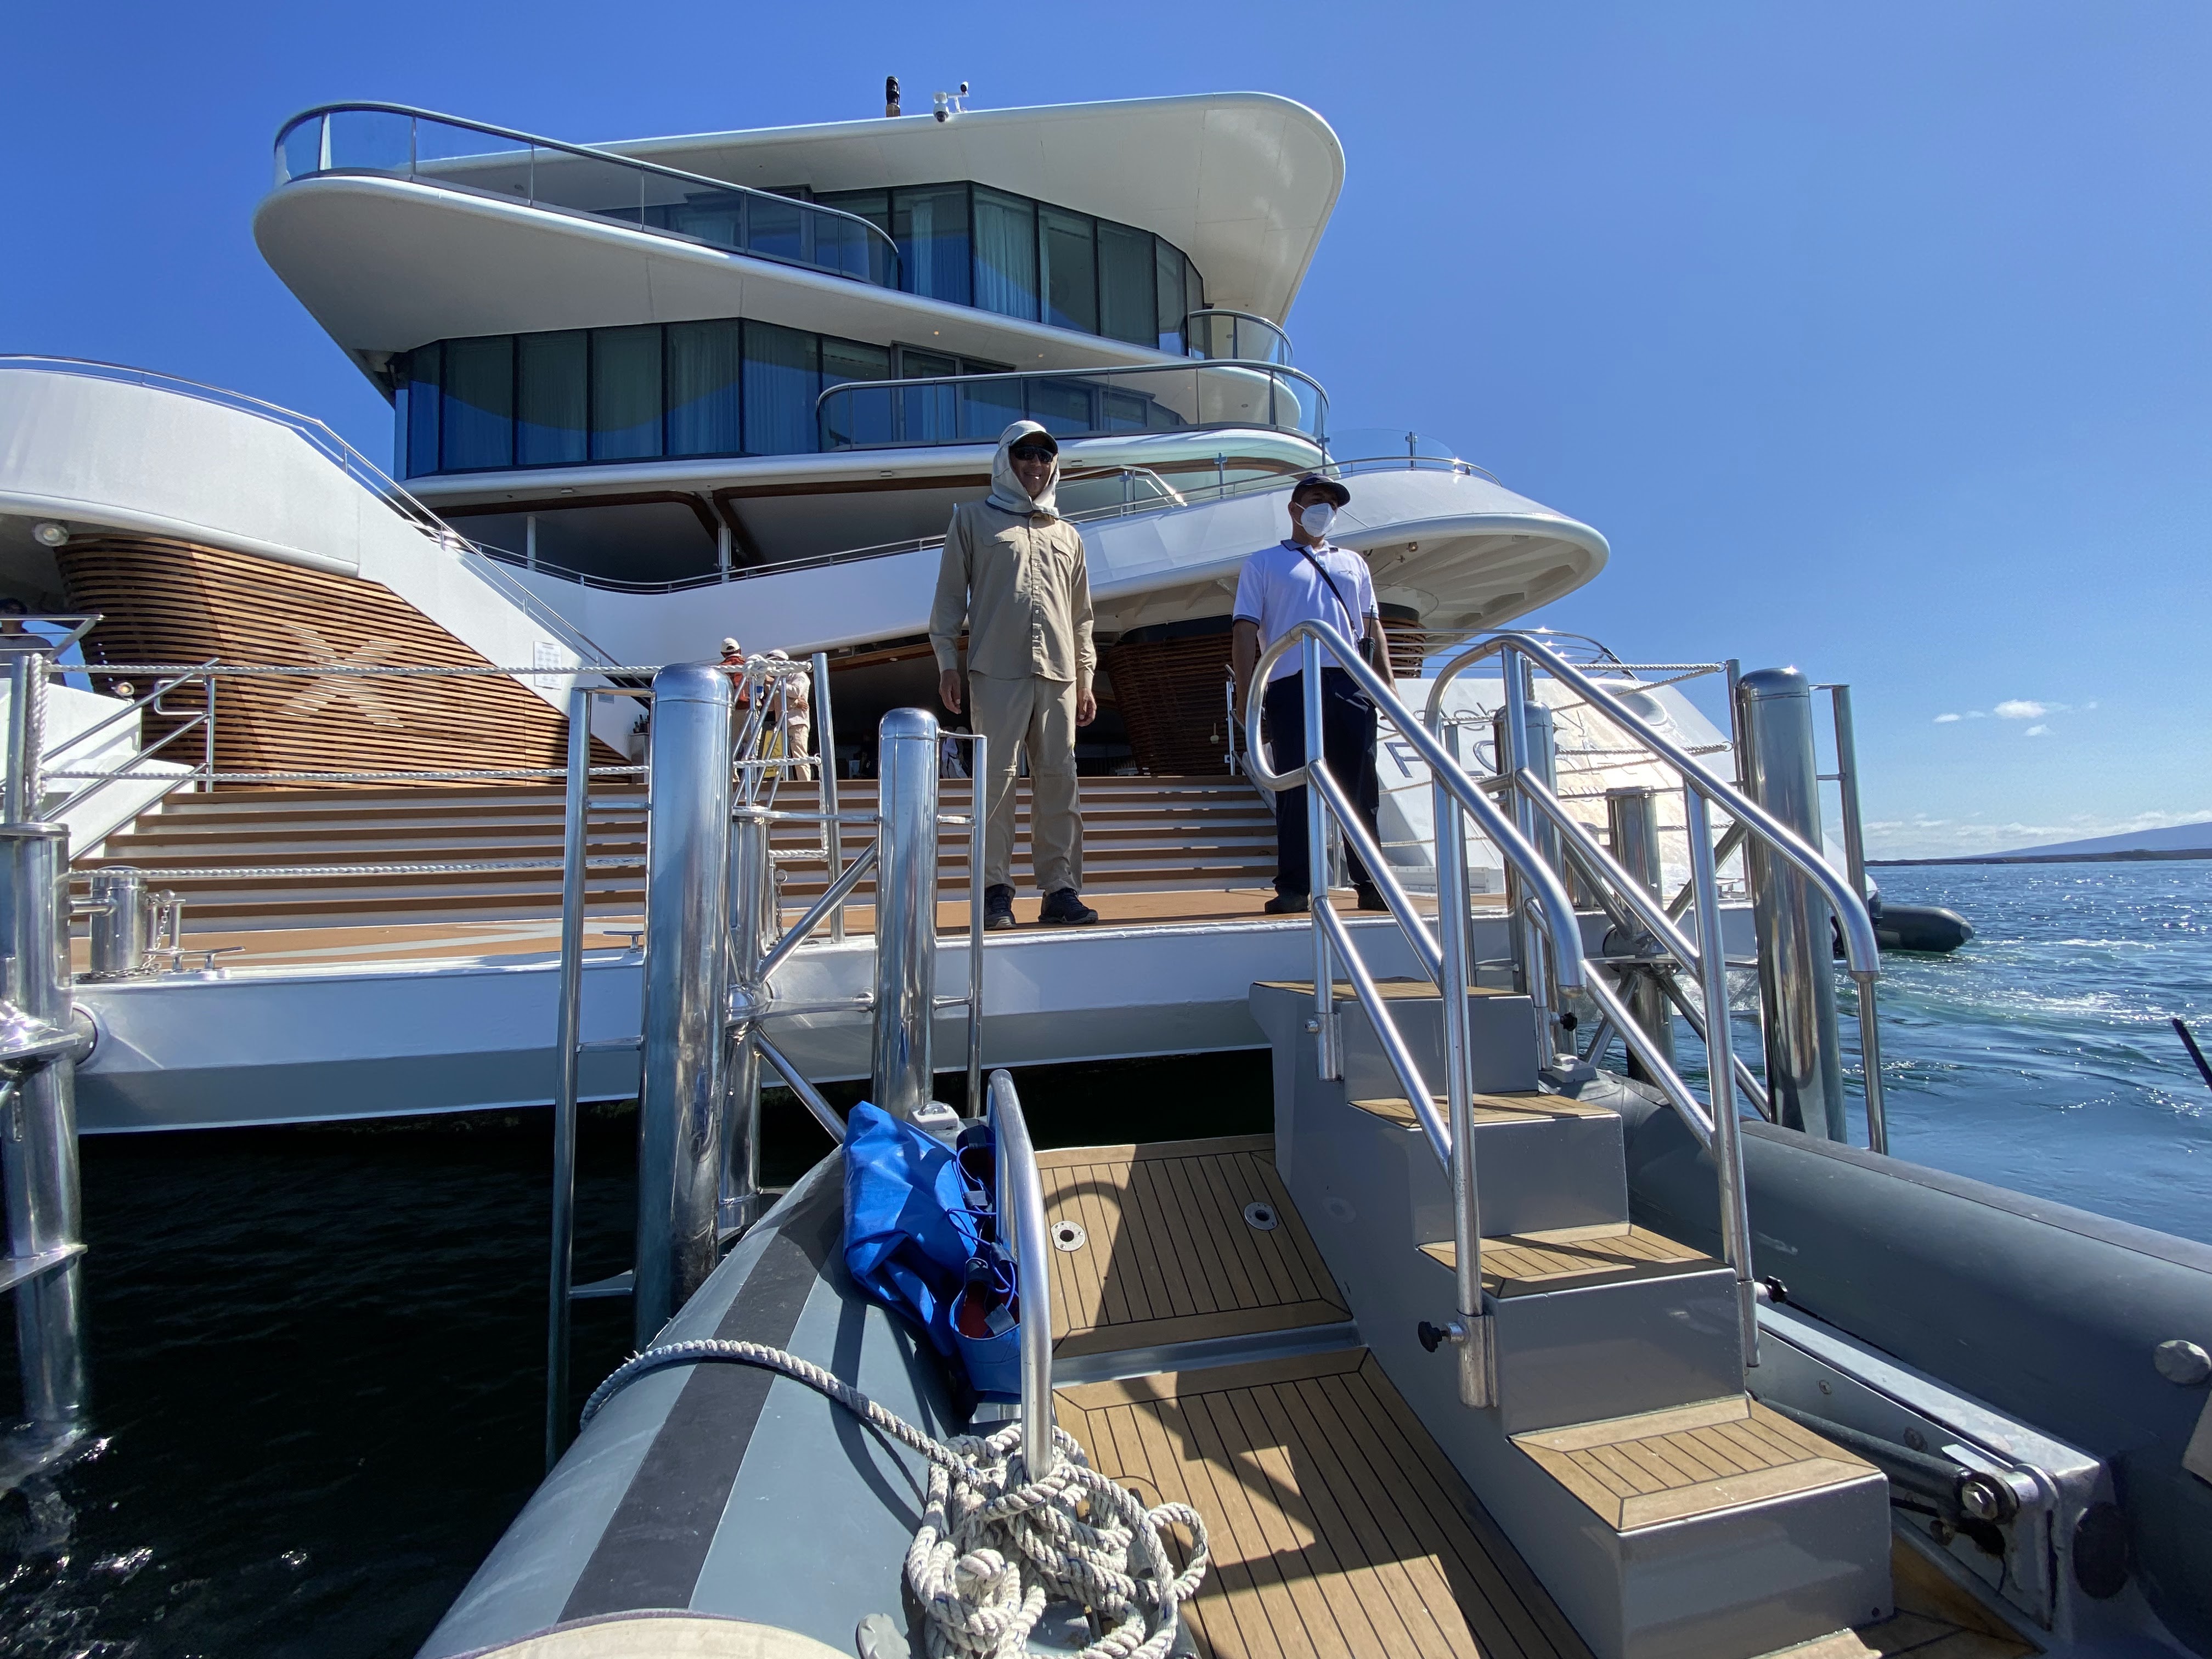
- When getting on and off the Zodiac from the Flora, you are required to have both hands free to hold the rails. If you have your gear in a backpack, then you can wear that while you get on and off the Zodiac. If you are holding your camera bag/backpack in one or both hands when attempting to get on or off the Zodiac, the crew will ask you to hand them your bag and they will hand it to another crewmember on the Zodiac (when getting on) or a crew member on the Flora when getting off. When getting on, that crew member on the Zodiac will often just set your backpack on a bench in the middle of the Zodiac or when getting off the Zodiac, they just put all bags on the ground at the "marina". The point is, if you don't want anyone handling your gear, make sure however you are carrying it, you can have both hands free. A backpack works as they will allow you to get on and off the Zodiacs while wearing a backpack as long as your hands are free.
- The second concern about protecting my gear was how much water I might get on my bag during the transit from the ship to shore and vice versa. I'd say for the most part, depending on where you sit and the conditions of the sea, gear in even something like a backpack alone or camera bag won't get wet. Your bag may get some splashes, but that's about it... most of the time. That said, there were two times during our trip that during transit, everyone on the Zodiac got completely wet from wave splashes due to the wind and the condition of the seas. The video below didn't capture the worst of it. By the time I got my phone out to take the video, the worst of it had passed. But you'll notice, the guide is completely soaked. So my advice is to find a way to protect your bag or gear from what can be significant water splash. I'll tell you my solution shortly.
- The third concern I had about protecting my gear was from what they call a "wet landing" where you literally have to get your feet wet to get ashore. For the most part, the wet landings are not rough but again, conditions can vary significantly from day to day. It also depends on how ambulatory and stable you can be when exiting a Zodiac that is bobbing up and down due to waves. If you think that situation may challenge your balance, then you may want to take extra caution to protect your gear. The example below was one of the easiest wet landings we experienced, and many were like that. But... one or two were worse.
- While not a concern about getting my gear wet, sometimes "dry landings" can pose challenges from a stability standpoint. During a dry landing, in many cases you are exiting a Zodiac up the stairs on to a very jagged lava rock ledge. The crew will have towels on the ground to help minimize slipping and falling but sometimes if the towels get bunched up they can also become a trip hazard. Point is, dry landings pose their own challenge from the standpoint of you falling and damaging your gear if you've got it in an nonpadded backpack. This is a time when there is a case for a good padded camera bag. I'm not trying to scare you, just inform you of the conditions. For me, I felt confident that such landings were not a stability challenge for me. Thus, having my camera in the solution I came upon below was not a concern for me. If you feel like this type of landing could cause you to fall, then take more precaution to protect your gear from falling. The dry landing in the video below was by far the easiest one we experienced. There were several others where we are attempting to come ashore on jagged lava rocks and the sea is causing the Zodiac to bob up and down.
The solution I ended up with was to use a Dry Bag. With the 200-600 plus camera body being so large, I actually didn't use a dry bag over my camera bag (LowePro ProTactic 450 AW II). If I did, I'd have to use a 65L (yes a 65L) dry bag to hold my very large camera bag. Then I'd have to figure out where to put a a dry bag that potentially got wet in transit once I got on shore. What I ended up doing was using a 35L dry bag and I placed my very large camera and lens directly in the drybag. Now this dry bag (Sea to Summit Big River Dry Bag) doesn't have backpack straps, so I just put the camera in the dry bag and then put the dry bag inside the back pack that Celebrity gave us for the cruise. If this sounds like a solution you may want, I'd recommend you get a backpack and drybag that fit before coming on the cruise to ensure the pair will work. I also rolled up a towel to put at the bottom of the dry bag to give my camera a little padding, but my backpack with cameras and lens rarely touched the ground so the towel was just a precaution. I ended up working out a process where when I got on land, I could easily ask a friend (where there were lava rocks and I didn't want to put the backpack down, to hold the backpack, then I just unzipped the backpack, then opened the dry bag (while leaving it inside the backpack) and pulling my camera out. Honestly, I think I got faster at getting my camera out than the folks I saw with camera bags who would look for something flat other than the sandy ground or lava rock to lay their camera bag flat to get their camera out. That said, the only situation that could have been a problem with my solution is if I fell on lava rocks while wearing my backpack during a rough dry landing. For me, that was a very low probability. Again, if you think that could be a challenge for you, consider a more padded solution.
If you are thinking of putting your camera bag inside a dry bag, consider if your dry bag got wet what would you do once on shore with a wet dry bag. If you have somewhere to put a wet dry bag, or just wipe it off with a towel and you have somewhere to store the dry bag when on shore along with your camera bag, then that may work for you. Honestly, even if your dry bag didn't get wet, if your configuration is to put your camera bag inside the dry bag, you still need a place to put the drybag once you get on land. Oh, I didn't mention, on a few occasions when the transit was extremely wet, I had a towel to just cover my backpack that had the dry bag inside with my camera inside the dry bag. I was never concerned about my gear getting wet. And even if the backpack got soaked (which it never did) to the point where the dry bag inside got wet, it would have been easy enough to wipe of the exterior of the dry bag and clean it up before attempting to take my camera out.
What I would not do is to take a backpack or camera bag with no other protection. While this solution is probably fine 90-95% if the time, what about that 1 in 10 times that your bag could get significantly wet or soaked. Again, a dry bag is insurance. On this trip, there was only one time I came close to needing it when everyone got soaked in transit. Either figure out how to put your camera bag inside a dry bag or your camera in a dry bag directly, but have a way to carry it hands free or the crew will take it and you don't want them handling your gear. Not that they will be malicious, but they are just loading or unloading a Zodiac with up to 10 people plus gear in sometimes very challenging situations. Protecting your expensive camera is probably not their primary focus, but rather, how to get the people safely on and off the Zodiac when the swells can cause a differential of 8 feet (plus or minus 4 feet) when getting on and off the Zodiac. Once when my wife was entering the Zodiac from the Flora, the crew members were on both sides of her holding her arms and under her armpits. The moment she stepped on the top step of the Zodiac and shifted her weight forward, the Zodiac dropped 4 feet. Luckily the crew was holding her and she was literally suspended in the air for a few seconds till the top step came back to the level of the marina and she quickly made the transition. So, the point is, the crew is focused on people safety 100% of the time. They have to be because things can happen very quickly.
TERRAIN
Generally in the Galapagos, you'll encounter three types of terrain.
- Very jagged lava rocks or rocky "trails" which can be challenging for maintaining stability while walking.


- Dirt trails

- Sandy beaches

There are several questions about what footwear to bring on this trip especially since Celebrity limits your luggage to 44 lbs. I'd be cautious about posts that say "Oh, I just brought a pair of shoes with a hardy bottom and they were just fine. What you don't know is how ambulatory or stable this person is and how much experience they have hiking on various types of terrain or how athletic they are. The could be a parkour champion for all you know. Only you know best how well you can traverse these types or terrain.
Take a look at the pictures above and judge for yourself. Yes, people wore all sorts of footwear from sneakers to hiking boots on the jagged lava rocks, to Tevas and the guides even wore closed toe Crocs for wet landings and subsequent walks.
In the Facebook Group, I have seen recommendations for Tevas for wet landings. I'll just say, if you plan to do this, do yourself a favor and before you come on the trip, put on your Tevas, then get them wet and even sprinkle a little sand on your feet if you can, then walk a mile or two and see if you get blisters or rubs. If they work for you, good. But many people who brought Tevas also mentioned that they got blisters after a wet landing and subsequent walk.
I'd always pay attention to what the guides were wearing. Most guides wore some type of hiking shoe on dry landings. One guide even wore full leather sneakers that didn't have a particularly "grippy" bottom. I asked her why she wore that and she said that the lava rocks easily tore up the canvas or nylon sides of her hiking shoes where the full leather lasted longer. She is also an experienced guide and is use to walking on all the terrain the Galapagos has to offer. I could see where if you stepped wrong the jagged lava rocks could tear a gash in the side of a nylon hiking shoe or sneakers. I wore such shoes, but I was careful how I stepped and my shoes made it through the week unscathed.
On sandy beach walks, the guides generally want you to wear closed toe shoes during embarking and disembarking from the Zodiac, but once ashore you can take off your shoes to walk on the beaches if you want. Depending on how strict your guide is, some even let me walk off the Zodiac on a wet landing barefoot. But that depends on the guide.
My guidance is to look at the terrain in the pictures above, understand your own skill level and bring footwear accordingly.
CLOTHES AND THE WEATHER
You'll be on the Equator. The Sun is a factor. the good news is the temperature is fairly constant so it's not like you have to pack for a range of temperatures from very cold to very hot. You can search the internet for average temperatures for the time of your visit.
You will see that in the pictures people wear everything from shorts and sleeveless tops to full length shirts and long pants. I'm almost certain that everyone was wearing sunscreen and applied it several times per day before an excursion. I always like to look at what the guides are wearing to get a gauge. That said, the guides spend many, many, many days outdoors so they tend to be more covered than not. For example, the Zodiac drivers who don't do any walking and are on the relatively cooler water are completely covered. I challenge you to see a patch of skin on them. All wore long pants, long sleeve shirts, gloves, hats, sunglasses and even face gaiters. Many of the guides wore long pants and long sleeve shirts. I did that one day and personally I got too hot, so I converted my long pants to shorts and then rolled up my sleeves for several excursions. Note that all the long pants and long sleeve shirts the guides wear are very lightweight. I brought the same weight clothes, but even at that, there were days when I got too hot and opted to go with shorts and extra sun screen.
 |
| One of our guides on the beach, |
 |
| Note what the Zodiac driver is wearing |
 |
| Even when the guides are not on excursion but come to greet the Zodiac they are fully covered. |
 |
| What a typical guide wears on excursions |
 | ||
On one of my first excursions I went full long sleeve and pants and I got too hot. After that I went shorts and lots of sunscreen.
|

On headgear, it's a good idea to wear a boonie hat, but not just any boonie hat. The wider the brim the better. Some even have a design where there is a cover for the back of your neck or the brim extends farther in the back. Many people wore ball caps, but it's up to you on how much sun protection you want. I'll say again, it's the equator and I can tell you, every guide was covered to the max.
I forgot to mention... all the above are comments about touring the islands. Quito is a different story. It's over 9000 feet in altitude and can get cold. Check the internet for average temps and dress accordingly. What worked for me is wearing what you see me wearing above with long pants and a long sleeve shirt (which are convertible and the sleeves roll up) and then in the morning when it was cold wear a rain layer which is dual purpose of keeping me warm and helping with the rain, and when it warmed up, I would just roll my sleeves up and convert my pants to shorts.
If you have any questions, just leave a comment on the Facebook page or send me an email from the link on the right.